A Homeowner's Guide to Mold in Attic Removal
Discovering mold in your attic can feel like a home emergency, but it doesn’t have to spiral into disaster. With a solid plan—and the right tools—you can tackle mold in attic removal step by step. This detailed guide will walk you through everything you need to know, from identifying the problem to ensuring it never returns. The key is pinpointing where moisture’s sneaking in, gauging how far the growth has spread, then deciding whether a DIY fix will do or if you need the professional touch of a service like Simon Air Quality.
First Steps After Finding Attic Mold
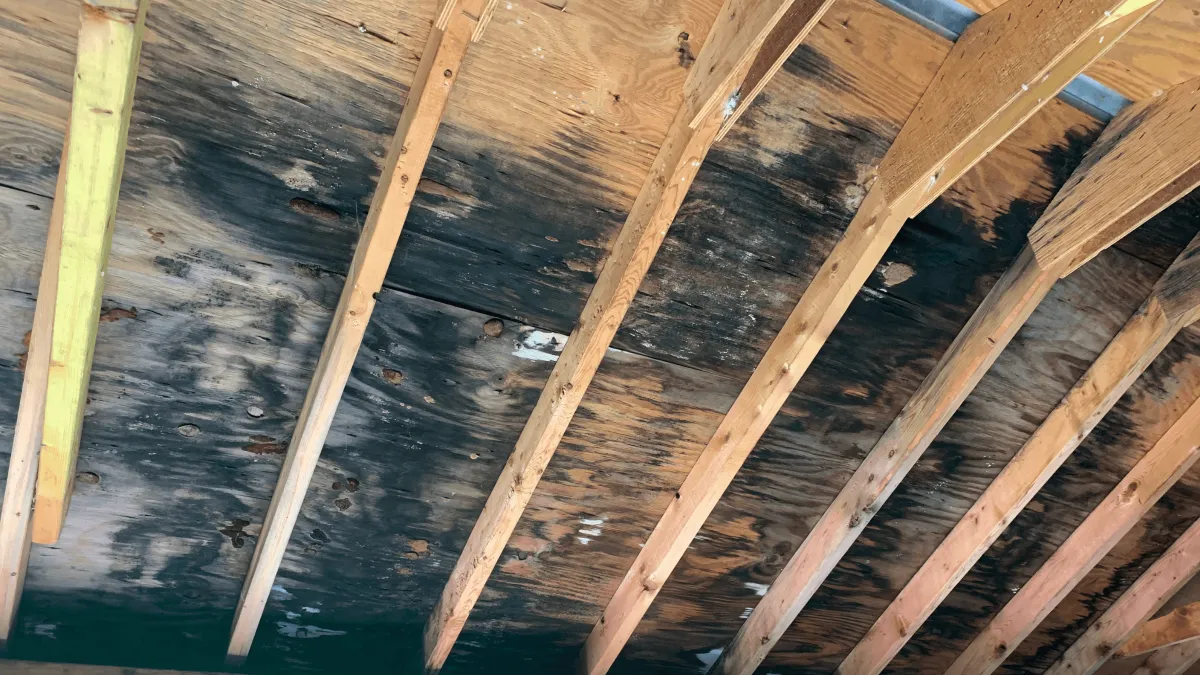
Stumbling upon dark, blotchy stains on your attic’s wood sheathing or insulation is unsettling. Maybe you spotted it during a routine check or a home inspection before listing the property. Either way, that first moment of panic usually comes with a flood of questions about the severity of the problem and the safety of your home.
Attics are notorious for becoming mold incubators because they often have the perfect conditions. Poor airflow, hidden roof leaks, and condensation combine with the cellulose in wood and drywall to give common villains—like Aspergillus or even the infamous black mold (Stachybotrys)—a perfect home.
The most common causes we see are:
Inadequate ventilation that traps warm, humid air, especially during seasonal shifts.
Minor roof drips from aging shingles or damaged flashing that you’d never notice until it’s too late.
Condensation from temperature swings in winter and summer, causing moisture to form on cool surfaces.
Bathroom or kitchen exhaust fans improperly vented directly into the attic instead of outside.
Remember: mold itself isn’t the root issue. It’s a clear and visible symptom of excess moisture that needs to be fixed to protect your home.
Understanding The Scope Of The Problem
Not all mold infestations are created equal. A handful of tiny spots on a single rafter won’t require the same intensive approach as widespread growth that has started to eat into your roof deck. Often, a persistent musty, earthy odor will alert you to hidden patches that visual checks might miss, signaling a more significant issue.
To get a clear picture of what you're dealing with, you need to perform a careful inspection:
Grab a powerful flashlight and your phone's camera. Systematically inspect every nook and cranny, taking pictures of any suspicious areas. Pay close attention to corners, areas around vents, and the underside of the roof sheathing.
Measure the size of the affected areas. As a general rule, any single patch of mold over one square foot is a strong indicator that you need professional help.
Note how deep the mold has penetrated. Is it just a surface stain, or does the wood feel soft, brittle, or flake away when touched? Deep penetration means the structural integrity could be at risk.
For an accurate identification of the mold species or a precise airborne spore count, you’ll want expert input. Right after you discover mold in your attic, consider professional mold testing services. You can also check out this guide on how to test for mold in your house for more detailed, actionable information.
Legal And Health Considerations
In Canada, and especially in humid regions, attic mold isn’t just a cosmetic issue. Under many local housing codes, visible mold is classified as a substandard condition that landlords and homeowners are legally required to remediate to ensure a safe living environment.
Health-wise, prolonged exposure to airborne mold spores can lead to a range of issues, including:
Persistent respiratory irritation, coughing, and wheezing.
The worsening of allergy or asthma symptoms, particularly in children and the elderly.
The long-term risk of structural damage that can compromise your home's safety and lead to costly repairs.
Any visible mold is a red flag for a deeper moisture problem. Let it linger and you’ll pay later—in both repair bills and, more importantly, your family's health and indoor air quality.
When you’re staring down significant infestations, calling in a specialist like Attic Mold Removal Ottawa is the most effective and safest choice. Our team combines precise, industry-standard mold removal with a thorough diagnosis of the moisture source, ensuring you don’t simply mask the problem but solve it permanently.
Once remediation is complete, an air purifier like the Amaircare 3000 is an excellent tool for maintaining clean air. Its powerful HEPA filtration captures lingering spores and other airborne contaminants, helping to keep your attic dry and your indoor air healthy.
Your Blueprint for Safe Attic Mold Removal
So, you've confirmed there's mold in the attic. Your first thought is probably, "How do I get rid of this?" While tackling a small, isolated spot yourself can be tempting, this is one job where you need to be extremely careful. The goal isn't just to wipe away the visible stains; it's about completely removing the mold colony and its airborne spores without letting them escape into the rest of your house.
The journey from spotting mold to getting rid of it for good is a methodical one. This visual guide gives you a clear look at the first few phases: discovery, identification, and planning what to do next.

As you can see, a successful cleanup starts long before you grab a bottle of anything. It's all about careful assessment and having a solid game plan.
Essential Safety Gear for Any Removal Job
Before you even think about touching that mold, let's talk about personal protective equipment (PPE). This is non-negotiable. Mold spores can cause some serious respiratory irritation and allergic reactions, making proper protection your absolute first line of defense.
Here’s your essential PPE checklist:
An N-95 or P-100 Respirator Mask: This is critical. It’s designed to filter out those microscopic mold spores you don't want to be breathing in. A simple dust mask is not sufficient.
Safety Goggles: Make sure they're the non-vented kind. This protects your eyes from airborne particles and any cleaning solutions you might use.
Disposable Coveralls: These keep spores off your clothes, so you don’t accidentally track them through your home later. They should be sealed at the wrists and ankles.
Long Gloves: Go for rubber or neoprene gloves that reach your mid-forearm. You want to keep this stuff off your skin.
Without this basic gear, you're risking direct exposure. It's worth noting that when the team at Simon Air Quality shows up, they come kitted out in industrial-grade PPE to ensure their safety and prevent any chance of cross-contamination.
Containing the Work Area Effectively
The single biggest mistake in DIY mold removal is the failure to properly contain the attic space. The moment you start scrubbing or disturbing mold, it releases millions of spores into the air. If you haven't sealed off the area, those spores can easily find their way through gaps and HVAC systems, starting new mold colonies in other parts of your home.
To do this right, grab some heavy plastic sheeting (at least 6-mil thick) and painter's tape. Use it to seal off any doorways, vents, and other openings that connect the attic to the rest of the house. You should even create a negative air pressure environment by setting up a fan pointing out a window. This helps pull the contaminated air outside instead of pushing it into your living spaces.
A critical part of the process is ensuring that the problem stays where it started. Effective containment is what separates a successful remediation from one that accidentally makes the situation worse.
The Cleaning and Drying Process
For a non-porous surface like metal, a simple mix of detergent and water can work. But we're talking about an attic. The sheathing, rafters, and insulation are all porous, which means the mold's "roots" (called hyphae) have likely grown deep into the material.
This is where specialized antimicrobial cleaning agents come in. They're designed to kill the mold at its source. After a thorough scrubbing, the area must be dried completely. This might be the most important step of all. Bring in fans and commercial-grade dehumidifiers to suck out every last bit of moisture, taking away the one thing mold needs to come back.
Once everything is clean and bone-dry, a HEPA (High-Efficiency Particulate Air) vacuum is a must. Unlike your regular household vacuum, a HEPA filter is fine enough to capture those microscopic mold spores, removing them from the environment for good. Remember to double-bag all contaminated materials—like old insulation or cleaning rags—in heavy-duty plastic bags and dispose of them according to your local regulations.
DIY vs Professional Mold Removal: When to Make the Call
Deciding whether to tackle attic mold yourself or bring in the pros can be tough. It really comes down to the size of the problem and your comfort level with the risks involved. If it's just a tiny spot, a DIY approach might work. But for anything more significant, the stakes get much higher.
